Profile your PHP applications with xhgui and xhprof on docker
29 Mar 2018Introduction
This article has been updated in november 2020. This setup uses version 5.0.2 of the tidways_xhprof php extension, with php in its version 7.4 and xhgui in its version 0.16.3.
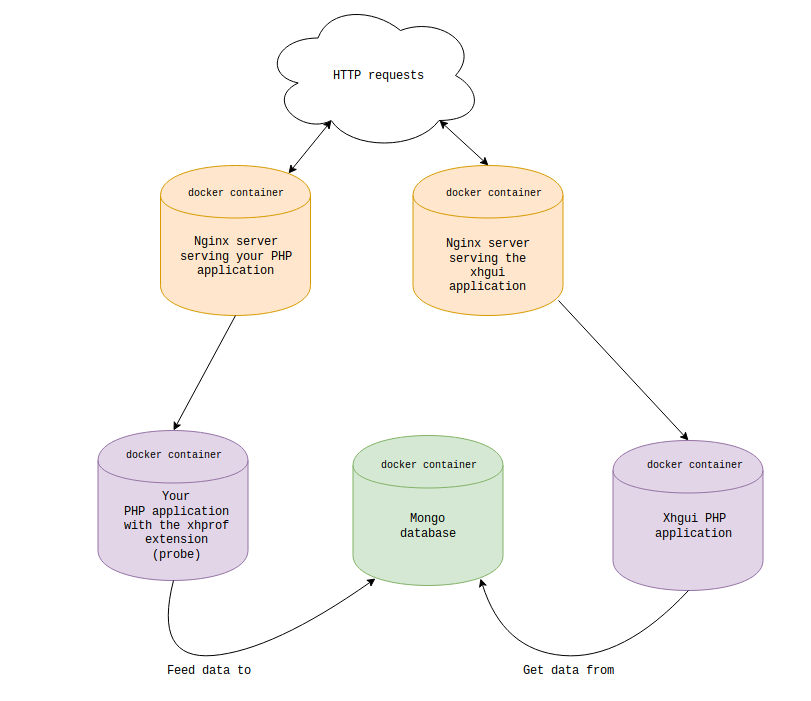
As a PHP developer, I cannot say I often had to profile my PHP applications but when I did to it was always for critical reasons. After a few reasearches I remember setting up Blackfire by Sensio. Even if Blackfire was fairly easy to set up, it did not meet my team expectations as we were not working on open source projects. Indeed Blackfire cannot be used for free to profile proprietary code. I also remember that the fact the profiling data was being send to a remote server also made a few faces wince. As our entire development environment was running on docker, I attempted to dockerize Xhprof, along with the web interface Xhgui. A schema will speak better than my words, here is what this tutorial will cover:

If you are in a hurry you can quickly get all files used in this tutorial from this github repository.
Edit: An official docker-compose.yml file has been made available since I firstly wrote this post. Have a look at https://github.com/perftools/xhgui/blob/master/docker-compose.yml
Setting up the php application running on docker
A prerequisite to this tutorial is to have your PHP application running on docker. I already wrote a post with a similar base so rather than doing a copypasta, follow the first section of this post then come back to this page. Of course the best thing to do would be to to adapt the content of the files with your own setup!
After that you should have a folder containing 5 files:
- docker-compose.yml
- Dockerfile-php-app
- php.ini
- app.conf
- index.php
Setting xhgui and xhprof
Let’s update our docker-compose.yml file by appending 3 new services.
services:

  ...
  php_xhgui:
    build:
      context: .
      dockerfile: Dockerfile-php-xhgui

  nginx_xhgui:
    build:
      context: .
      dockerfile: Dockerfile-nginx-xhgui
    ports:
      - 8081:80
    depends_on:
      - php_xhgui

  mongo:
    image: mongo:4.4.1
As you can already figure, we now need to create 3 more files:
- Dockerfile-php-xhgui
This image will contain the mongo extension to fetch the profiled data, as well as the xhgui application.
FROM xhgui/xhgui:0.16.3

COPY xhgui_config.php /var/www/xhgui/config/config.php
- Dockerfile-nginx-xhgui
This image mainly copy the xhgui application files. This will allow nginx to serve the static files.
FROM nginx:1.18.0

RUN apt-get update
RUN apt-get install -y git

RUN git clone https://github.com/perftools/xhgui.git /var/www/xhgui
RUN chmod -R 0777 /var/www/xhgui/cache

COPY xhgui.conf /etc/nginx/conf.d/default.conf
- xhgui.conf
The PHP index directory will be located at /var/www/xhgui/webroot/. fastcgi_pass is set to the docker-compose service name (php_xhgui) and will be internally resolved by docker’s embedded DNS. The rest is pretty standard.
server {
    listen 80 default_server;
    listen [::]:80 default_server;

    root   /var/www/xhgui/webroot;
    index  index.php;

    location / {
        try_files $uri $uri/ /index.php$is_args$args;
    }

    location ~ \.php$ {
        try_files $uri =404;
        include /etc/nginx/fastcgi_params;
        fastcgi_pass    php_xhgui:9000;
        fastcgi_index   index.php;
        fastcgi_param SCRIPT_FILENAME $document_root$fastcgi_script_name;

        client_body_buffer_size 1M;
    }
}
- You may have noticed that a file named xhgui_config.php is copied in the Dockerfile-php-xhgui image.
We need this one to configure the connection between mongo and the php image. Let’s create it and add this content:
<?php

return [
    'save.handler' => 'mongodb',
    'db.host' => 'mongodb://mongo:27017',
    'db.db' => 'xhprof',
    'db.options' => [],
    'profiler.enable' => function() {
        return true;
    },
    'profiler.simple_url' => null,
    'profiler.options' => [],
    'date.format' => 'M jS H:i:s',
    'detail.count' => 6,
    'page.limit' => 25,
];
To tune the config as you wish, refer to the default configuration on github.
Lastly we have to update our PHP docker image to include what’s necessary for profiling. Let’s add these lines to Dockerfile-php-app:
# install the xhprof extension to profile requests
RUN curl "https://github.com/tideways/php-xhprof-extension/archive/v5.0.2.tar.gz" -fsL -o ./php-xhprof-extension.tar.gz && \
    tar xf ./php-xhprof-extension.tar.gz && \
    cd php-xhprof-extension-5.0.2 && \
    apk add --update --no-cache build-base autoconf && \
    phpize && \
    ./configure && \
    make && \
    make install
RUN rm -rf ./php-xhprof-extension.tar.gz ./php-xhprof-extension-5.0.2
RUN docker-php-ext-enable tideways_xhprof

# install mongodb extension. The xhgui-collector will send xprof data to mongo
RUN apk add --no-cache autoconf alpine-sdk
RUN pecl install mongodb && docker-php-ext-enable mongodb

# install composer
RUN curl -sS https://getcomposer.org/installer | php -- --install-dir=/usr/local/bin --filename=composer

# install the package that will collect data
WORKDIR /var/xhgui
RUN composer require perftools/php-profiler perftools/xhgui-collector alcaeus/mongo-php-adapter

# copy the configuration file
COPY xhgui_config.php /var/xhgui/config/config.php
Be aware that these instructions will work for PHP 7 applications only!
Run docker-compose build to create the new version of our PHP image followed by docker-compose down (this will stop and remove the containers, making sure new images are use in the next run), then docker-compose up -d. Hit http://localhost:8081/ to reach xhgui.
Profiling requests
At the very beginning of your PHP application, add the following code:
require '/var/xhgui/vendor/autoload.php';
$config = include '/var/xhgui/config/config.php';
$profiler = new \Xhgui\Profiler\Profiler($config);
$profiler->start();
In our example simply update index.php.
<p>Let's do some math.</p>

<ul>
    <?php
        require '/var/xhgui/vendor/autoload.php';
        $config = include '/var/xhgui/config/config.php';
        $profiler = new \Xhgui\Profiler\Profiler($config);
        $profiler->start();

        for ($i = 0; $i < 10; $i++) {
            echo sprintf("<li>%s * 5 = %s</li>", $i, $i*5);
        }
    ?>
</ul>
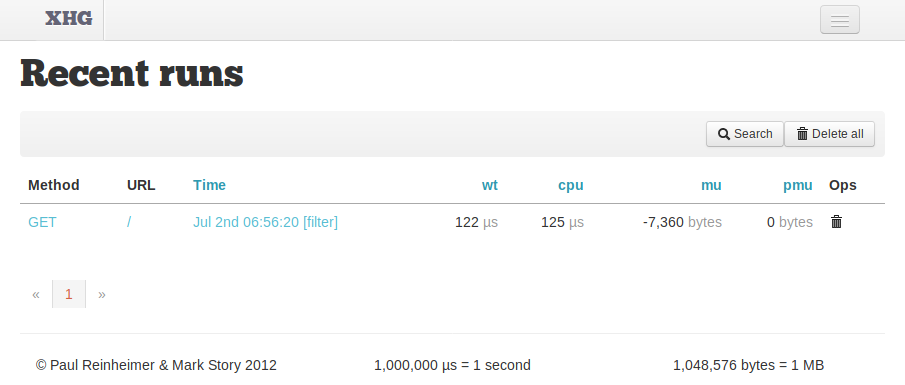
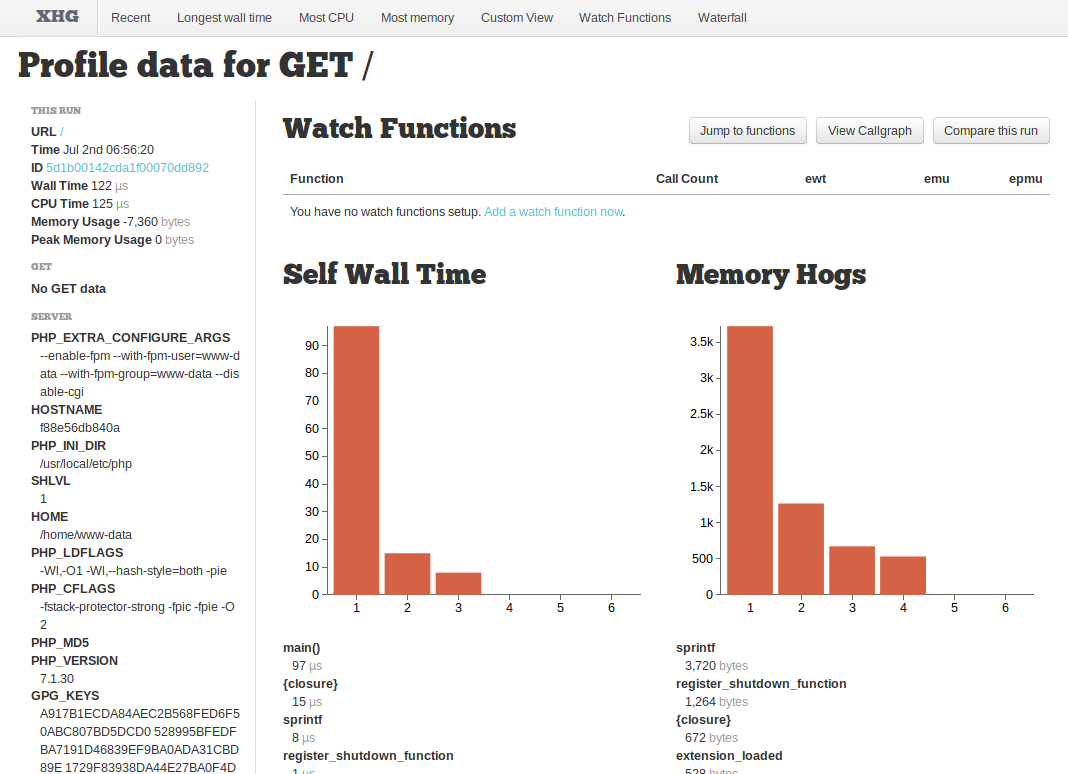
Hit your app at http://localhost:8080/ then refresh http://localhost:8081/. You should see your first profile data.


If you found this tutorial helpful, star this repo as a thank you! ⭐
Happy profiling!

